Custom Stages
Wanting to create a custom Binding of Isaac stage is common. But the vanilla API does not have support for this. IsaacScript offers support for custom stages as part of its standard library. See the getting started section below.
Historically, people have used the StageAPI library to build custom stages, but using IsaacScript over StageAPI has several advantages. See the motivation section below.
Getting Started
First, make sure that you are familiar with IsaacScript and have built a practice mod or two. (See the getting started guide.)
Step 1 - Make Your Rooms
Create Rooms Using Basement Renovator
The most important part of a custom stage is custom rooms. So, you'll need to make some custom rooms for your custom stage.
Isaac comes with a room editor, but it no longer works with the Repentance DLC. Instead, you are supposed to build custom rooms using the community-built Basement Renovator program.
Using Basement Renovator to make rooms is outside of the scope of this tutorial, but it is pretty self-explanatory. You can read the GitHub readme for more details, if needed. Start a new file and start building some rooms.
Room Shapes and Door Slots
Most of your rooms will probably be standard 1x1 rooms with all 4 doors enabled. (A brown door represents that it is enabled, and a grey door represents that it is disabled.) However, you will also need to throw in some rooms of other shapes. This is because when IsaacScript goes to deploy your custom rooms, it will match the vanilla rooms that are generated by the game.
For example, if you use Caves 1 as a base for your stage (more on that later), then the vanilla floor generation algorithm might randomly choose to generate this room:
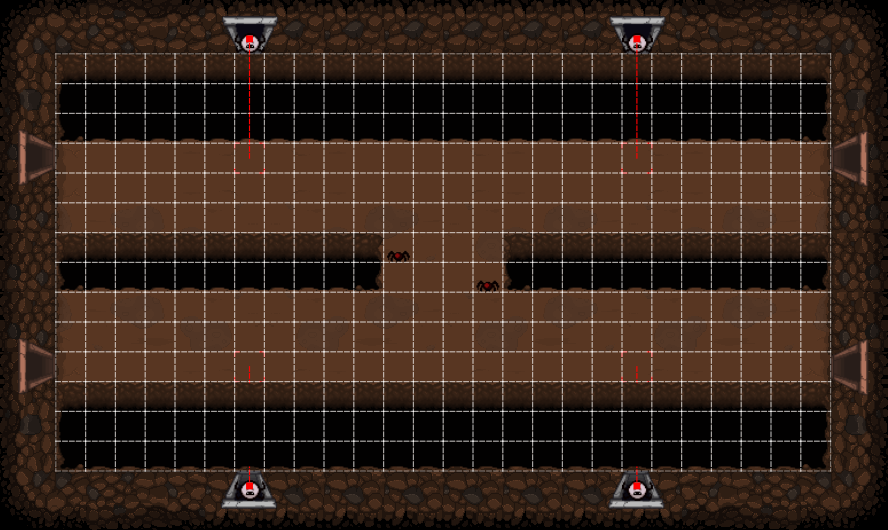
This is a 2x2 room. When IsaacScript goes to replace this room, it will look through your rooms for a matching room - a 2x2 room with only doors on the left and right sides. If it doesn't find any, then it will revert to just use any 2x2 room. If it can't find any 2x2 rooms, then it will give up, and leave the room as-is, and generate an error message in the console.
This means that if you want to have 100% custom rooms generated for your custom stage, you must have at least one room for every room shape.
Saving Your Work
Once you have created your rooms, save them as an XML file in the following location:
project/customStages/foo.xml
(This assumes that your mod is called "project" and your custom stage is called "foo".)
You don't need to include the corresponding STB file; all IsaacScript needs is the XML.
Note that you can actually save the XML file anywhere you like, as long as the path lines up with what you specify in the tsconfig.json file (more on that later). You should probably not put it in your "mod" directory though, since the XML file does not actually need to be uploaded to the Steam Workshop.
Step 2 - Set Up tsconfig.json
After you have created your rooms and saved them as an XML file, the next step to tell IsaacScript about them. You define and configure your custom stages by adding information to the tsconfig.json file. (This is the TypeScript configuration file. It is already included with every IsaacScript mod, and lives in the root of your project.)
First, make sure that it has a "$schema" field at the top:
// We specify the schema to get auto-complete and validation.
"$schema": "https://raw.githubusercontent.com/IsaacScript/isaacscript/main/packages/isaacscript-cli/schemas/tsconfig-isaacscript-schema.json",
Second, make sure it has an "isaacscript" field at the bottom:
// IsaacScript settings
"isaacscript": {
  // A list of objects that represent the custom stages that are in your mod, if any. See:
  // https://isaacscript.github.io/main/custom-stages
  "customStages": [
    {
      "name": "Foo",
      "xmlPath": "./customStages/foo.xml",
      "roomVariantPrefix": 100,
    },
  ],
},
For the most basic stage, only the name, xmlPath, and roomVariantPrefix fields are required. But you will likely want to make additional customizations. There are many more optional fields that you can specify, like baseStage to specify what vanilla floor number should be used as a base for the stage. These optional fields are documented in the CustomStageTSConfig interface, so keep that in mind.
When you are first building and testing your custom stage, you can use a roomVariantPrefix of 100. However, before you publish your mod to the Steam Workshop, you need to update this to a unique number that won't conflict with any other mods. For more information, see the Custom Stage Room Variant Prefixes section below.
Step 3 - Upgrade Your Mod
You must upgrade your mod with ISCFeature.CUSTOM_STAGES. (This is similar to how we use the other features of isaacscript-common.)
Furthermore, if you intend for the player to travel to your custom stage by using a trapdoor, then you will probably want to also use the "custom trapdoors" feature. If so, then you need to additionally use ISCFeature.CUSTOM_TRAPDOORS.
Specifically, upgrading your mod should look something like this:
mod.ts
import { ISCFeature, upgradeMod } from "isaacscript-common";

const MOD_NAME = "isaacscript-mod-example";
const modVanilla = RegisterMod(MOD_NAME, 1);
const features = [
  ISCFeature.CUSTOM_STAGES,
  ISCFeature.CUSTOM_TRAPDOORS,
] as const;
export const mod = upgradeMod(modVanilla, features);
(With a mod.ts file like this, you can then import the mod object from elsewhere in your codebase and use methods such as setCustomStage and spawnCustomTrapdoor. More on that in the next step.)
Step 4 - Add a Trapdoor to Go There
Once you have created your custom rooms and defined your custom stage in the tsconfig.json file, you need to add some code to your mod to generate a way for the player to get there. Obviously, the specifics of this will depend on how you want your custom stage to work. Maybe you want to add an additional trapdoor next to the Downpour trapdoor, or maybe you want to add an additional trapdoor inside of the Basement 1 shop.
As an example, let's imagine that we want a trapdoor to appear in the top-left hand corner of the starting room of the run. To create a custom trapdoor, we simply use the spawnCustomTrapdoor helper function (which is provided by ISCFeature.CUSTOM_TRAPDOORS).
import { LevelStage, ModCallback } from "isaac-typescript-definitions";
import { mod } from "./mod";

const TOP_LEFT_CORNER_GRID_INDEX = 32;

mod.AddCallback(ModCallback.POST_GAME_STARTED, postGameStarted);

function postGameStarted(isContinued: boolean) {
  if (isContinued) {
    return;
  }

  mod.spawnCustomTrapdoor(
    TOP_LEFT_CORNER_GRID_INDEX,
    "Foo",
    LevelStage.BASEMENT_1,
  );
}
Here, "Foo" is the name of our custom stage and LevelStage.BASEMENT_1 means "the first floor". Now, by jumping into the trapdoor, the player will be taken to the custom stage of "Foo 1". That's all we need to do!
If you specifically wanted to take the player to "Foo 2", then you would specify LevelStage.BASEMENT_2 instead. There are also other optional arguments that you can use; see the documentation for the spawnCustomTrapdoor method.
If you want to code some custom way to travel to the custom stage that does not involve a trapdoor, you can do that too. See the following section.
Going There With a Hotkey
During development, you might want to set up a custom hotkey to warp to your custom stage, which will speed up the testing process. You can do this with the setCustomStage helper function. If doing this, you must also call the reloadRoom function immediately afterwards to prevent being dragged into the goto console command room.
(If you want to use custom hotkeys, make sure that you upgrade your mod with ISCFeature.CUSTOM_HOTKEYS.)
For example:
mod.setHotkey(Keyboard.F1, () => {
  mod.setCustomStage("Foo");
  reloadRoom();
});
Reference Implementation
If you want to dive into an actual working example, you can find a reference mod on GitHub that creates a new custom stage called "Slaughterhouse". This is a minimal mod, with only one room per floor shape, using the code snippets that we have already seen above.
Bosses
If your custom stage does not have any custom bosses, then a vanilla boss will appear in the boss room corresponding to the base stage and base stage type that you have specified. For example, if you chose Caves 1 as a base, then you would randomly get a boss of Chub, C.H.A.D., Gurdy, and so on.
On the other hand, if you specify the bossPool field in the tsconfig.json file, then the stage library will replace the vanilla boss room with a randomly selected one from the pool.
For example, imagine that your custom stage had two bosses, Alice and Bob. First, we would create them in the entities2.xml file, like we would for any other custom NPC:
<entity name="Alice" anm2path="custom-bosses/alice.anm2" baseHP="234" boss="1" champion="0" collisionDamage="1" collisionMass="20" collisionRadius="20" friction="1" gridCollision="walls" numGridCollisionPoints="12" portrait="111" shadowSize="30" stageHP="0" variant="0">
  <gibs amount="10" blood="1" bone="0" eye="1" gut="1" large="1" />
</entity>

<entity name="Bob" anm2path="custom-bosses/bob.anm2" baseHP="234" boss="1" champion="0" collisionDamage="1" collisionMass="20" collisionRadius="20" friction="1" gridCollision="walls" numGridCollisionPoints="12" portrait="111" shadowSize="30" stageHP="0" variant="0">
  <gibs amount="10" blood="1" bone="0" eye="1" gut="1" large="1" />
</entity>
(We should not specify the bossID field when declaring our entities here - that isn't needed.)
Second, we would create rooms for each boss in Basement Renovator. Make sure that each room has a type of a Boss Room, and an arbitrarily chosen sub-type corresponding to the boss. For example, we'll choose Alice to have a sub-type of 1, and Bob to have a sub-type of 2.
On the right-hand side of Basement Renovator, you can right click on the room in order to change its type and sub-type. The top-most field is the type, which defaults to "Normal Room". The bottom-most filed is the sub-type, which defaults to 0.
Third, we need to specify our bosses in the bossPool field of our tsconfig.json file:
"bossPool": [
  {
    "name": "Alice",
    "subType": 1,
    "weight": 3,
  },
  {
    "name": "Bob",
    "subType": 2,
    "weight": 1,
  },
],
Here, we map the name of the boss to the arbitrarily chosen sub-type. By specifying a sub-type of 1 for Alice, IsaacScript will automatically choose a random boss room matching that sub-type.
We also specify what the weight should be for each boss. In this case, we specified a weight of 3 for Alice, meaning that it will be three times as likely for Alice to appear than Bob. Use a weight of 1 for all of your bosses if you want them all to be equally likely to appear.
Now, we can test the bosses in-game, and everything should work as expected.
Note that it is possible to have vanilla bosses in the boss pool, if needed. Thus, we could have a boss pool with a mix of custom bosses and vanilla bosses, or a boss pool of only vanilla bosses. To add a vanilla boss, just use the name that matches the real name of the entity, and use the sub-type corresponding to the BossID enum. (And make sure that you create the corresponding rooms for the sub-type in your XML file.)
Motivation
StageAPI is a fantastic library created by DeadInfinity and BudJMT, the two smartest people in the Isaac community. Until 2022, it has been the engine that has powered all Isaac mods that have custom stages, like Revelations and Fiend Folio. However, no library is perfect. I wanted to try and improve on Stage API with the following goals in mind:
1. An Isaac library should be dead-easy to use
- Creating a new stage should be as easy as specifying some values in a config file and then calling
spawnCustomTrapdoor. - Everything complicated should be abstracted away, with the ability to customize if needed.
- Auto-complete on functions and methods should work automatically. Just start typing.
2. An Isaac library should be safe
- Creating stages can get complicated. You should immediately know if you are using a function incorrectly. You should never be running around in-game, troubleshooting run-time errors.
- It should be impossible to push broken code to production.
3. An Isaac library should work without being a Workshop dependency
- When a user wants to play a mod, they should only have to subscribe to one thing on the Steam Workshop. Forcing the end-user to subscribe to multiple things is painful, complex, and unnecessary.
- Having stage logic bundled with the mod preserves backwards compatibility and ensures that stage logic is tightly-coupled to the mod logic that is using it.
- Having stage logic bundled with the mod allows the mod author to be in complete control of when they update to the latest version, if ever. This also allows the upstream library to make breaking changes and stay clean without having to worry about having perpetual technical debt (like Stage API).
4. An Isaac library should use real XML/STB files
- StageAPI forces people to convert their XML files to something called "Lua rooms", which is XML data converted to Lua. It then imports the Lua rooms at run-time and manually deploys their contents.
- Lua rooms are, in essence, the biggest hack in the history of Isaac modding. A lot of code is dedicated to making it all work. (You have to architect a solution for loading empty room data, work around grid entities not spawning properly, handle special entities like Slides, and so on.)
- But what if there was a better way? There's no need to go down this rabbit hole. The IsaacScript library uses real XML/STB files, and lazy-loads their data when needed using the
gotocommand, resulting in a completely seamless experience. - This means that for people creating new stages, things are ultra simple - no Basement Renovator hooks required!
5. An Isaac library should be compatible with other Isaac libraries
- No library should irreparably alter the base game. In other words, it should make no vanilla resource replacements. This is the same principle as not importing for side effects.
- With no resource replacements, there's never a compatibility issue. Each mod can use their own library for their own stage.
6. An Isaac library shouldn't cause lag on boot
- StageAPI loads data for hundreds of rooms on the first run, which causes lag.
- Libraries shouldn't do anything if they are not being used. This is the same principle as not importing for side effects.
- Instead, by lazy loading data, IsaacScript custom stages only incur a tiny amount of lag when they are first traveled to. (Only the specific data needed for the actual generated floor is retrieved.)
7. An Isaac library should have excellent documentation
- StageAPI has historically been undocumented. Recently, there have been some excellent documentation additions by Filloax (the person behind Revelations). With that said, all of the documentation is manually typed and prone to error.
- An old adage in programming is that if it isn't documented, then it doesn't exist. Beautiful, searchable, and easy-to-use documentation should be a first-class goal.
- Documentation should be automatically generated with tooling so that it never gets out of date.
With these improvements in mind, I've created the IsaacScript stage library. Since it is integrated into the normal standard library, using it is effortless. See the getting started section above.
Custom Stage Room Variant Prefixes
Each custom stage needs a unique room variant prefix. And all of the room variant prefixes for each mod must not overlap with any other ones - otherwise, loading the custom stage will not work properly. In order to prevent conflicts, this section documents all of the arbitrary prefixes claimed by each mod. Valid prefixes are between 101 and 999, inclusive.
| Room Variant Prefix | Mod Name |
|---|---|
| n/a | n/a |
(There are no mods yet that have claimed any prefixes. Click on the edit button below to add yours.)